Set up server-side tracking 2026: self-host GTM – the complete guide
Set up server-side tracking with Google Tag Manager yourself: advantages, disadvantages, costs and hosting options plus the complete step-by-step guide in 19 steps with screenshots – server container, Docker, GA4, Meta CAPI.
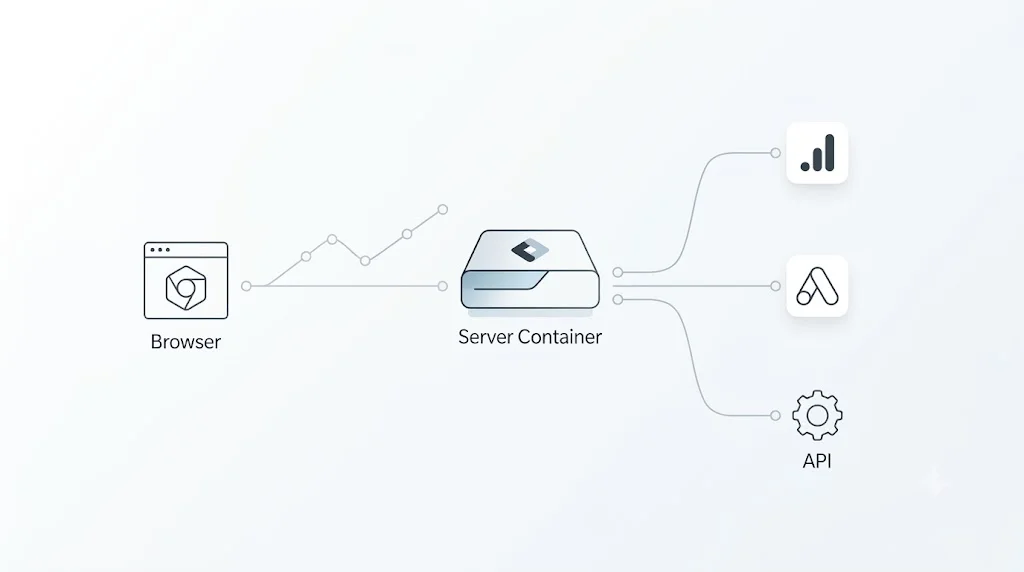
Tracking is the foundation of every serious performance decision – yet that very foundation is crumbling. Ad blockers, browser restrictions such as Safari ITP and ever shorter cookie lifetimes tear gaps into the data, and in 2026 data protection and platform algorithms keep raising the pressure. Server-side tracking closes these gaps by moving measurement from the browser to your own server. This guide first shows the complete, end-to-end tested setup in 19 steps with screenshots from practice – and then advantages, disadvantages, costs and strategy in the necessary depth.
The essentials at a glance:
- Server-side tracking sends events first to your own server, which forwards them in a controlled way to GA4, Google Ads or Meta.
- Setup: two GTM containers (web + server), one tagging server, GA4 as the destination – in 19 steps (right below).
- Advantages: more complete data, longer cookies, full data control, faster website, data enrichment.
- Disadvantages: more complexity, ongoing costs, maintenance – and no replacement for consent.
- Costs: self-hosted from ~10–20 €/month, Google Cloud Run ~50–120 €/month, managed from ~25 €/month.
First: A deeper comparison of server-side and client-side – with current figures on data loss, Meta CAPI and Schrems II – is provided in the foundational article Server-side vs. client-side tracking. This post is the practical, complete guide.
Requirements and recommended server power
A self-hosted setup needs only modest resources:
- A Google Tag Manager account (the interface in this guide is in English).
- Your own server (VPS or dedicated) that can run Docker containers.
- A reverse proxy (Traefik, Nginx or Caddy) that terminates HTTPS via Let's Encrypt.
- Access to the DNS management of your domain.
- The Docker image provided by Google:
gcr.io/cloud-tagging-10302018/gtm-cloud-image:stable.
On performance: sGTM is surprisingly frugal.
| Load | Recommendation (host for both services) |
|---|---|
| Small/medium website (up to ~tens of thousands of visitors/day) | 2 vCPU / 4 GB RAM is comfortably enough |
| Higher volume or server-to-server tags (Meta/Google Ads CAPI) | 4 vCPU / 8 GB RAM |
| Per single sGTM instance | ~256–512 MB RAM at idle; max. 1 vCPU |
Rule of thumb: One instance with 1 vCPU handles roughly 50–100 requests per second – that is millions of events per day. For most websites the tagging server is barely noticeable.
Architecture: two containers and the data flow
Server-side tagging always consists of two GTM containers that work together – the most important point for understanding the whole setup:
- Web container (
GTM-XXXXXXX) – runs in the browser and collects events such as page views, clicks and purchases. - Server container – runs on your own server, receives the events and forwards them to GA4, Google Ads or Meta.
The server container itself consists of two running services (Docker containers): the tagging server (production) and a preview server for testing. This is how the data flows:
Browser  →  Web container (GTM-XXXX)  →  https://sst.yourdomain.com
                                              (tagging server)
                                                        ↓
                                              Server container (GA4 tag)
                                                        ↓
                                                Google Analytics 4
Hosting note: You do not need Google Cloud Run. The tagging server is a simple Docker image that runs on any server able to operate Docker containers behind a reverse proxy with HTTPS. In GTM, this uses the „Manually provision tagging server” path.
Guide: set up server-side tracking in 19 steps
The following guide documents a real, end-to-end tested setup with two GTM containers, a self-hosted tagging server and Google Analytics 4 as the data destination. Domains, IDs and keys in the screenshots are redacted for privacy. The 19 steps break down into six phases:
| Phase | Steps | Result |
|---|---|---|
| 1 – Create server container | 1–3 | Container exists, config string copied |
| 2 – Host the tagging server | 4–6 | Server runs under your own domain |
| 3 – Test the server container | 7–8 | Connection via your own domain confirmed |
| 4 – GA4 & web container | 9–12 | Data destination and collector in place |
| 5 – Connect the data | 13–17 | Browser sends via the server to GA4 |
| 6 – Go live & test | 18–19 | Tracking runs for real and is verified |
Phase 1: Create the server container in GTM
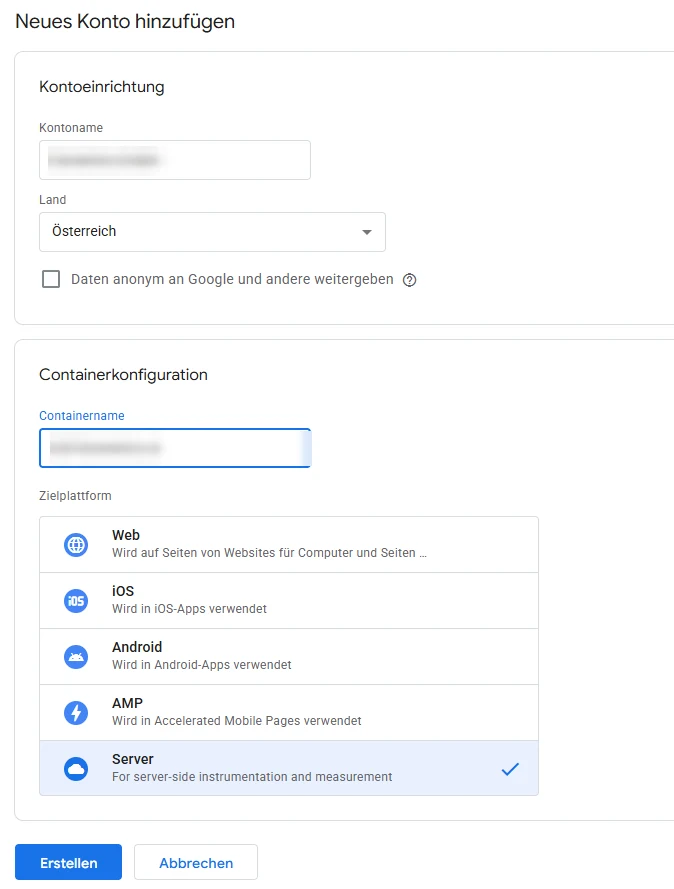
Step 1: Create a new server container
In GTM, click the three dots next to the account name → Create Container. Then:
- Name the container, e.g.
sgtm – yourdomain.com. - Choose Server as the target platform.
- Click Create.
Step 2: Open Install Google Tag Manager
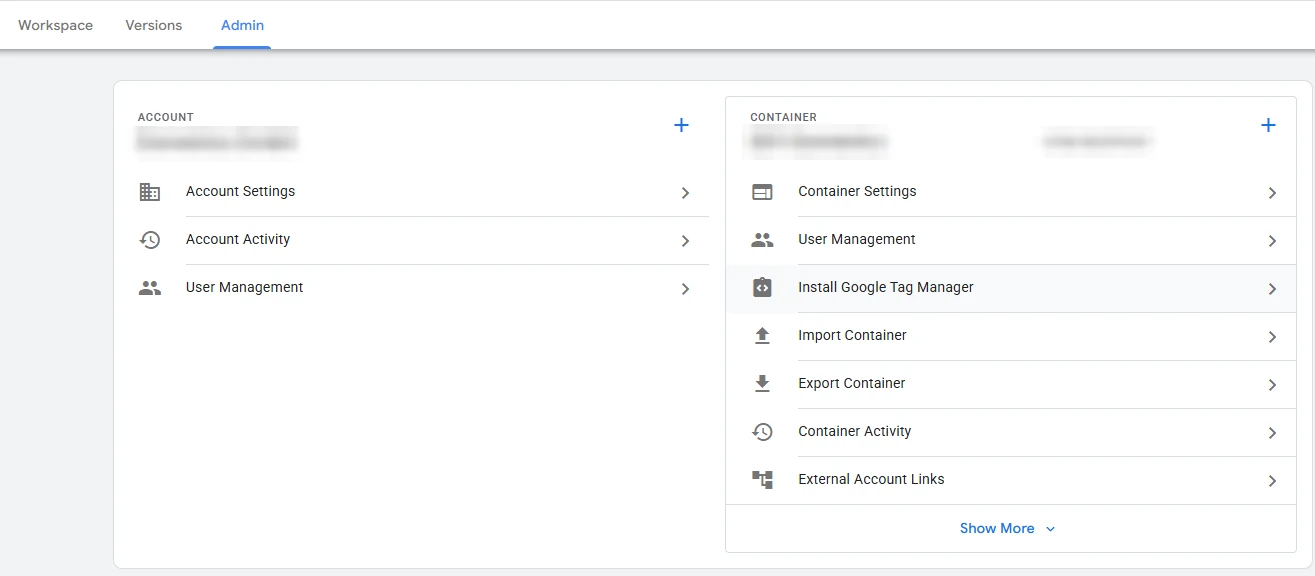
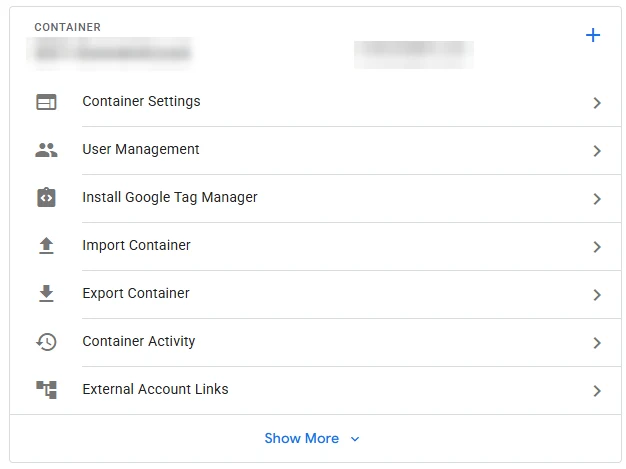
Switch into the new container → Admin → Install Google Tag Manager. This is where the configuration lives that your own server needs next.
Step 3: Manually provision the tagging server
The crucial step: do not choose automatic cloud provisioning, but Manually provision tagging server. GTM then shows the Container Configuration string (a long Base64 block).
- Select Manually provision tagging server.
- Copy the container config string – it is needed shortly as
CONTAINER_CONFIG.
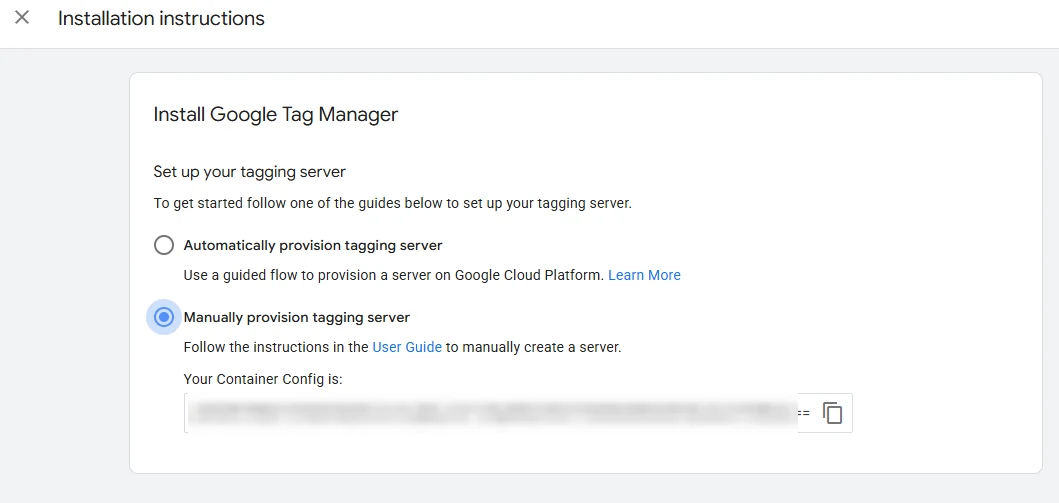
Good to know: If the config string is lost later, it is shown again under Admin → Container Settings.
Phase 2: Self-host the tagging server
Step 4: Set the DNS records
At your DNS provider, set two A records pointing to the server’s public IP – one for the production and one for the preview server:
sst.yourdomain.com          A    <server IP>
sst-preview.yourdomain.com  A    <server IP>
Wait until both resolve (nslookup sst.yourdomain.com) – otherwise the reverse proxy cannot issue an SSL certificate. DNS propagation can take from a few minutes to a few hours.
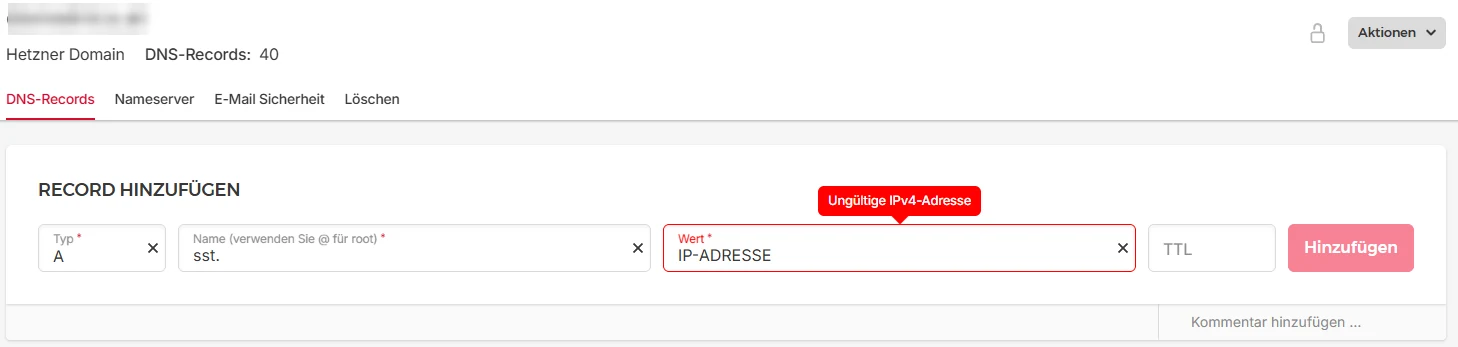
Important: Always use a subdomain of the actual tracking website as the tagging domain (first-party cookies!). If yourdomain.com is tracked, use sst.yourdomain.com – never a third-party domain.
Step 5: Configure the Docker containers
Start two Docker containers from the same image gcr.io/cloud-tagging-10302018/gtm-cloud-image:stable – a preview server and a tagging server (production). Both run internally on port 8080 and differ only in their environment variables:
services:
  sgtm-preview:
    image: gcr.io/cloud-tagging-10302018/gtm-cloud-image:stable
    restart: unless-stopped
    environment:
      CONTAINER_CONFIG: "<config-string>"
      RUN_AS_PREVIEW_SERVER: "true"
      PORT: "8080"
    # -> reverse proxy to sst-preview.yourdomain.com, port 8080

  sgtm:
    image: gcr.io/cloud-tagging-10302018/gtm-cloud-image:stable
    restart: unless-stopped
    environment:
      CONTAINER_CONFIG: "<config-string>"
      PREVIEW_SERVER_URL: "https://sst-preview.yourdomain.com"
      PORT: "8080"
    # -> reverse proxy to sst.yourdomain.com, port 8080
Note here:
- Preview server: exactly one instance, no autoscaling.
- Tagging server: may have several instances for availability – but a maximum of 1 vCPU each.
- CONTAINER_CONFIG must be byte-identical on both services.
- The health-check path is
/healthy.
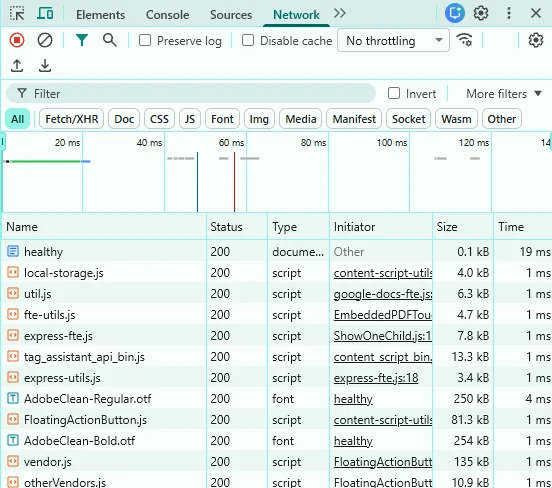
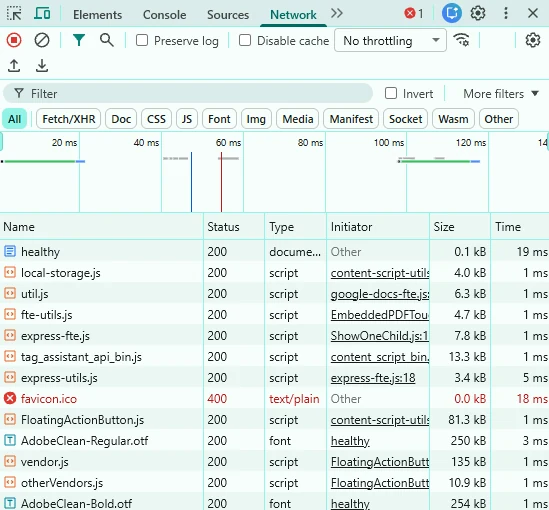
Step 6: Check the health checks
Verify that both services are running: https://sst-preview.yourdomain.com/healthy and https://sst.yourdomain.com/healthy must each return HTTP 200. In the browser DevTools (Network tab) the requests appear cleanly with status 200.
Phase 3: Test the server container
Step 7: Enter the server URL in GTM
So that GTM knows where the server runs, go to Admin → Container Settings of the server container and set the Server container URL to https://sst.yourdomain.com → Save.
Step 8: Start preview and confirm your own server
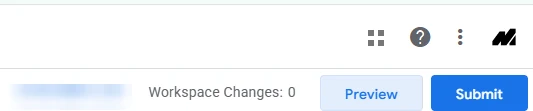
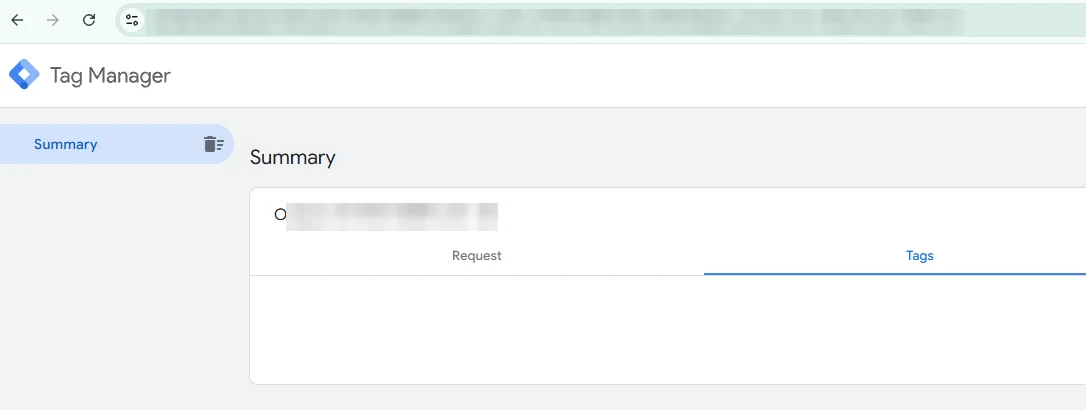
Click Preview in the top right of the server container. The Tag Assistant now connects via your own domain (sst.yourdomain.com) – no longer via a Google URL. This confirms that self-hosting is working.
Phase 4: Set up GA4 and the web container
Step 9: Create the GA4 property
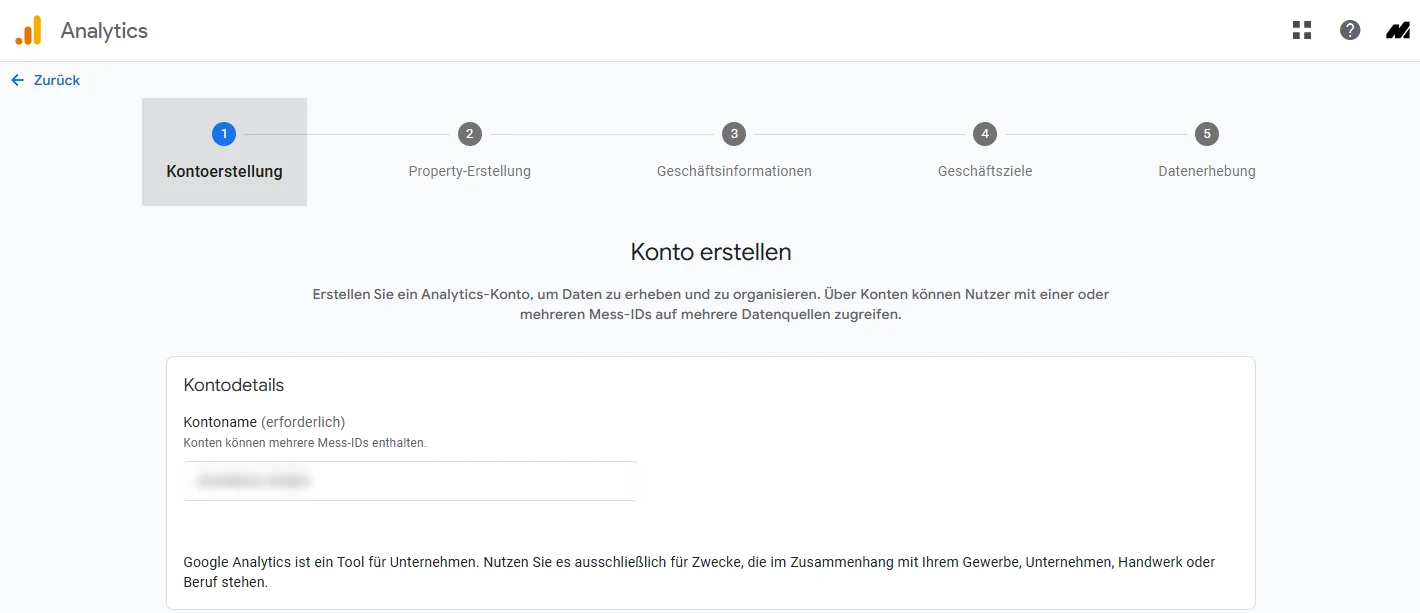
On analytics.google.com create the data destination: Admin → Create → Account (country: Austria) → Property (time zone Vienna, currency EUR).
Step 10: Read out the Measurement ID
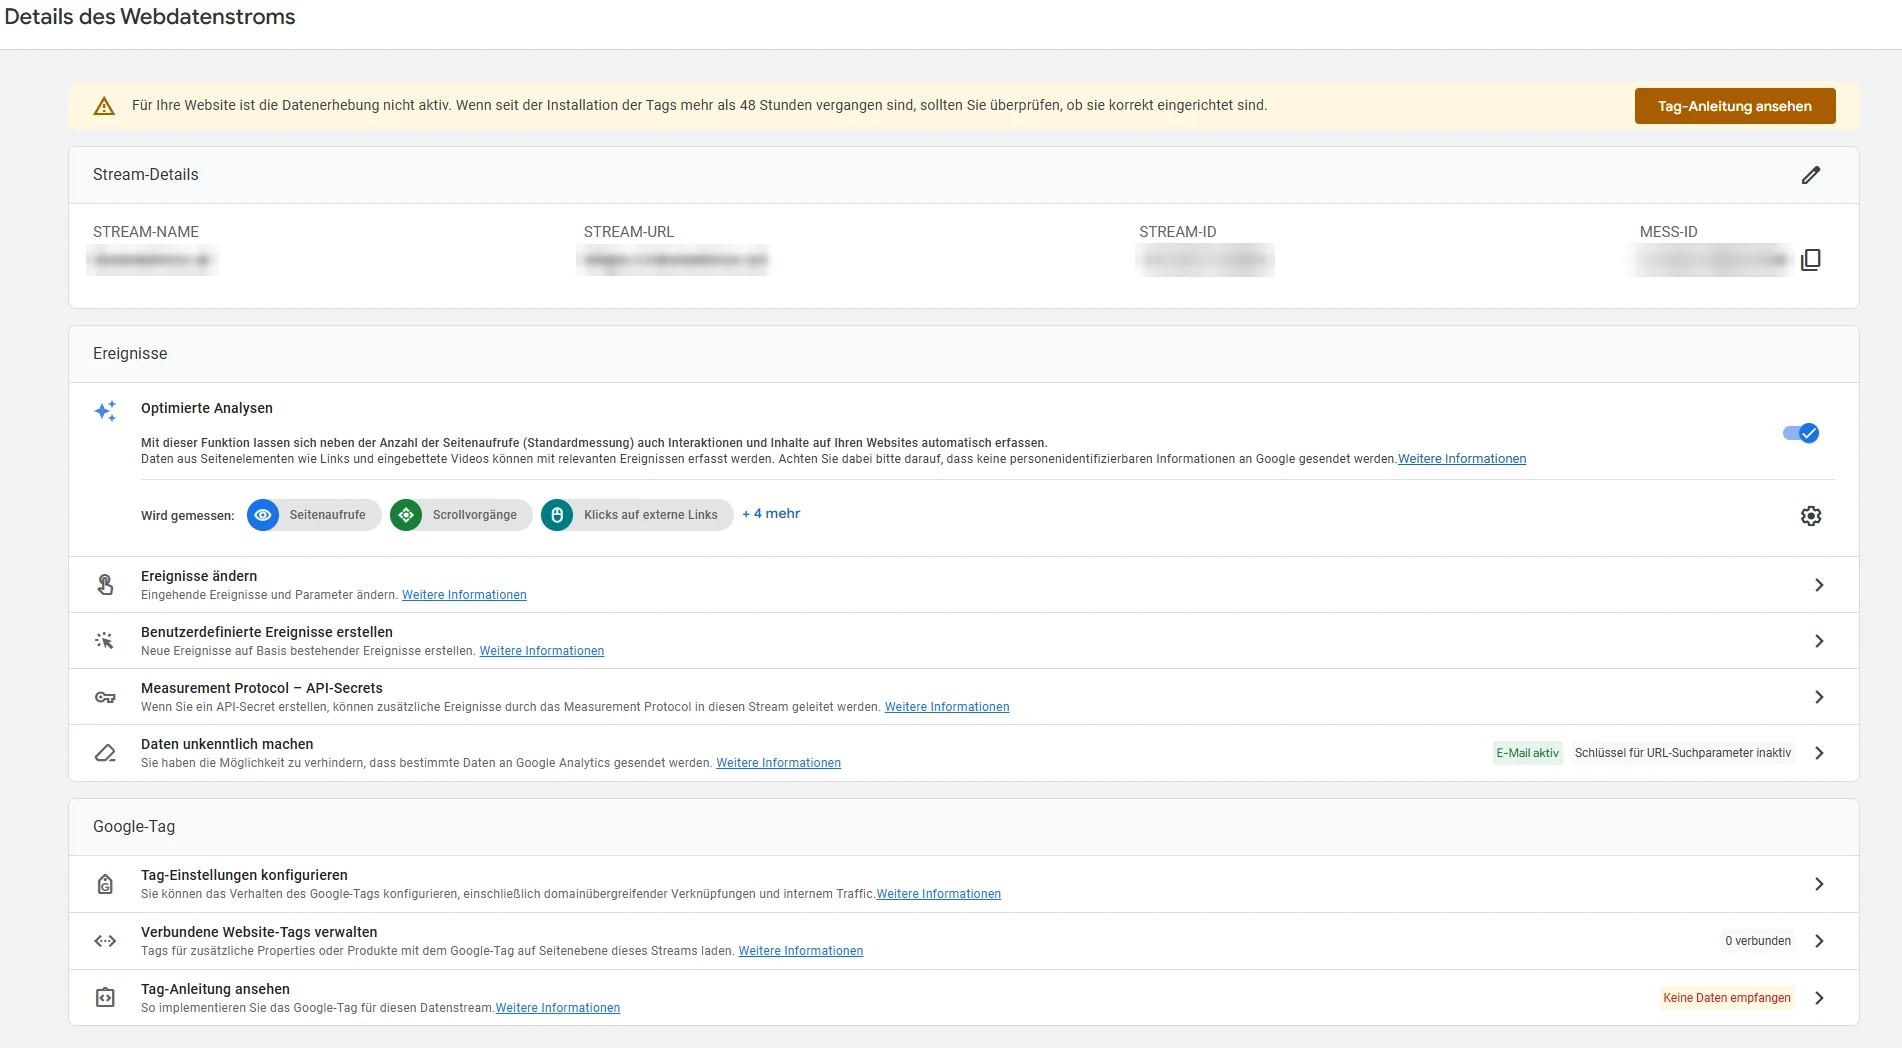
In the data stream (Data Stream → Web), enter the URL and copy the Measurement ID in the format G-XXXXXXXXXX. It is the central identifier that connects the web and server containers next.
Step 11: Create the web container
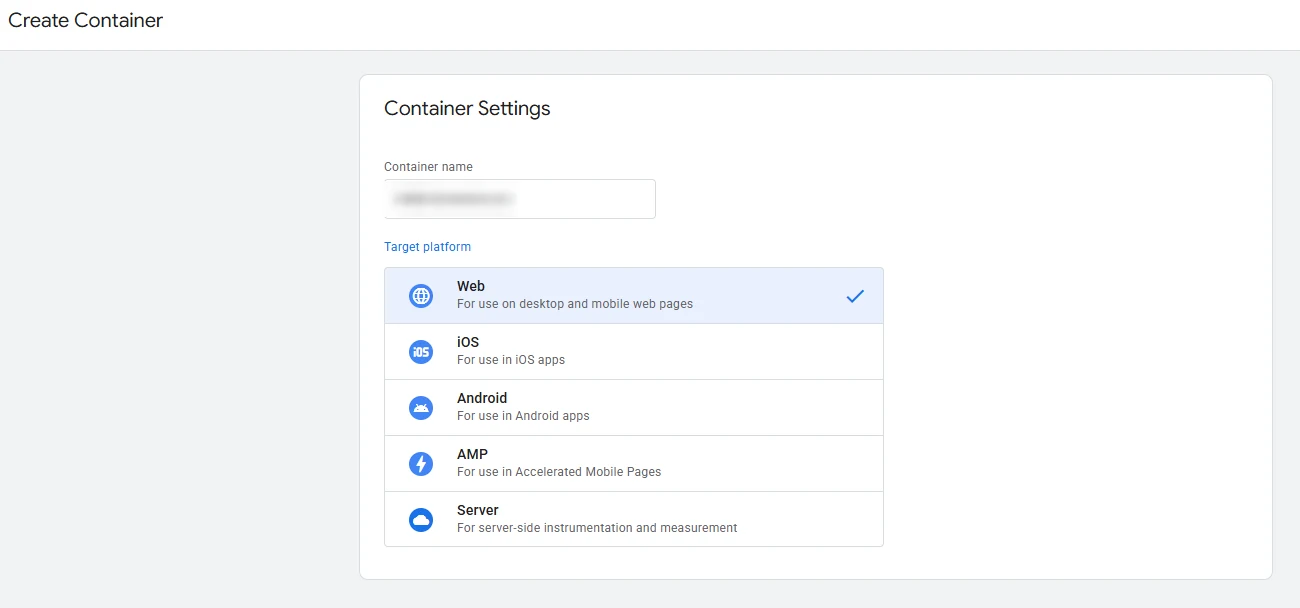
In GTM → Create Container → name web – yourdomain.com → target platform Web → Create. This provides the ID GTM-XXXXXXX and the installation snippet.
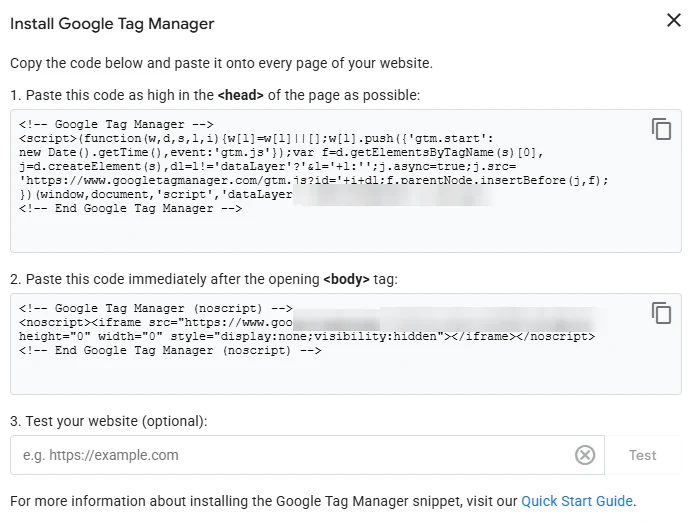
Step 12: Install the GTM snippet in the website
The GTM snippet consists of two blocks:
- The
<script>block belongs as high as possible in the<head>. - The
<noscript>block directly after the opening<body>.
Phase 5: Connect the web and server containers
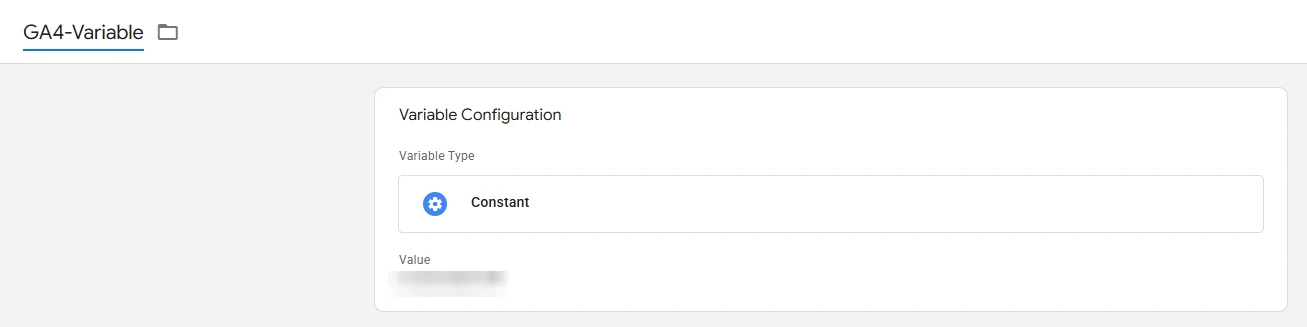
Step 13: GA4 constant in the web container
In the web container, create a Constant variable that holds the G-XXXXXXXXXX (e.g. GA4-Variable). This way the ID is maintained in a single place only and stays maintainable.
Step 14: Google Tag with server_container_url
Create a Google Tag in the web container (Tags → New → „Google Tag”):
- Tag ID:
{{GA4-Variable}}. - Configuration settings: add the parameter
server_container_url=https://sst.yourdomain.com. - Trigger:
Initialization – All Pages. - Save.
This sends all browser events through your own server instead of directly to Google.
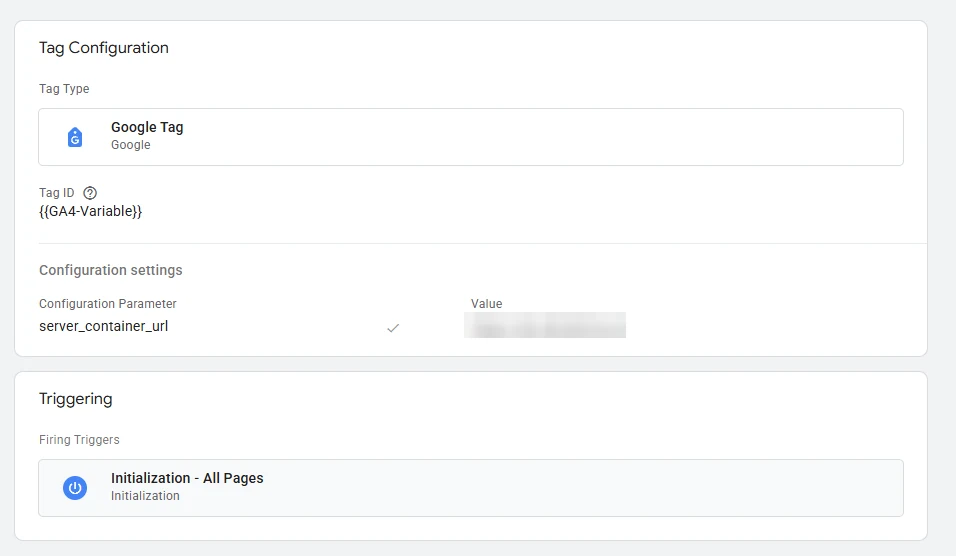
server_container_url and trigger.Step 15: GA4 constant in the server container
In the server container, likewise create a Constant variable with the same G-XXXXXXXXXX.
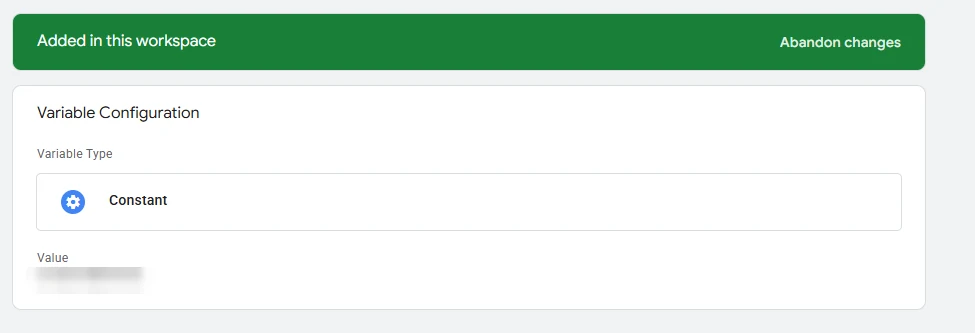
Step 16: Custom trigger (Client Name = GA4)
Create a custom trigger (Triggers → New → Trigger type: Custom → Some Events) with the condition Client Name equals GA4. If Client Name is not in the dropdown, it can be enabled via „Choose Built-In Variable…”.
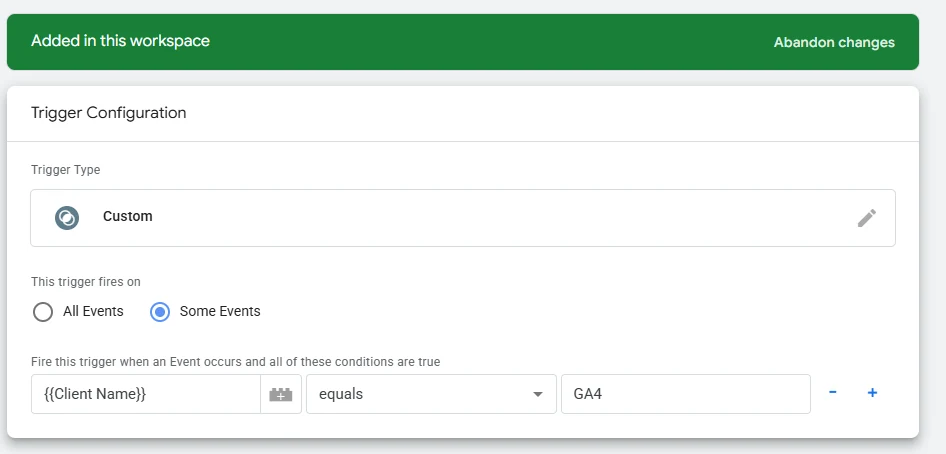
Client Name equals GA4.Step 17: GA4 tag in the server container
Create the GA4 tag in the server container (Tags → New → „Google Analytics: GA4”):
- Measurement ID: the server constant
{{GA4-Variable}}. - Default Parameters to Include: All.
- Default Properties to Include: All.
- Trigger: the custom trigger from step 16.
- Name the tag (e.g.
GA4 – Server) and save.
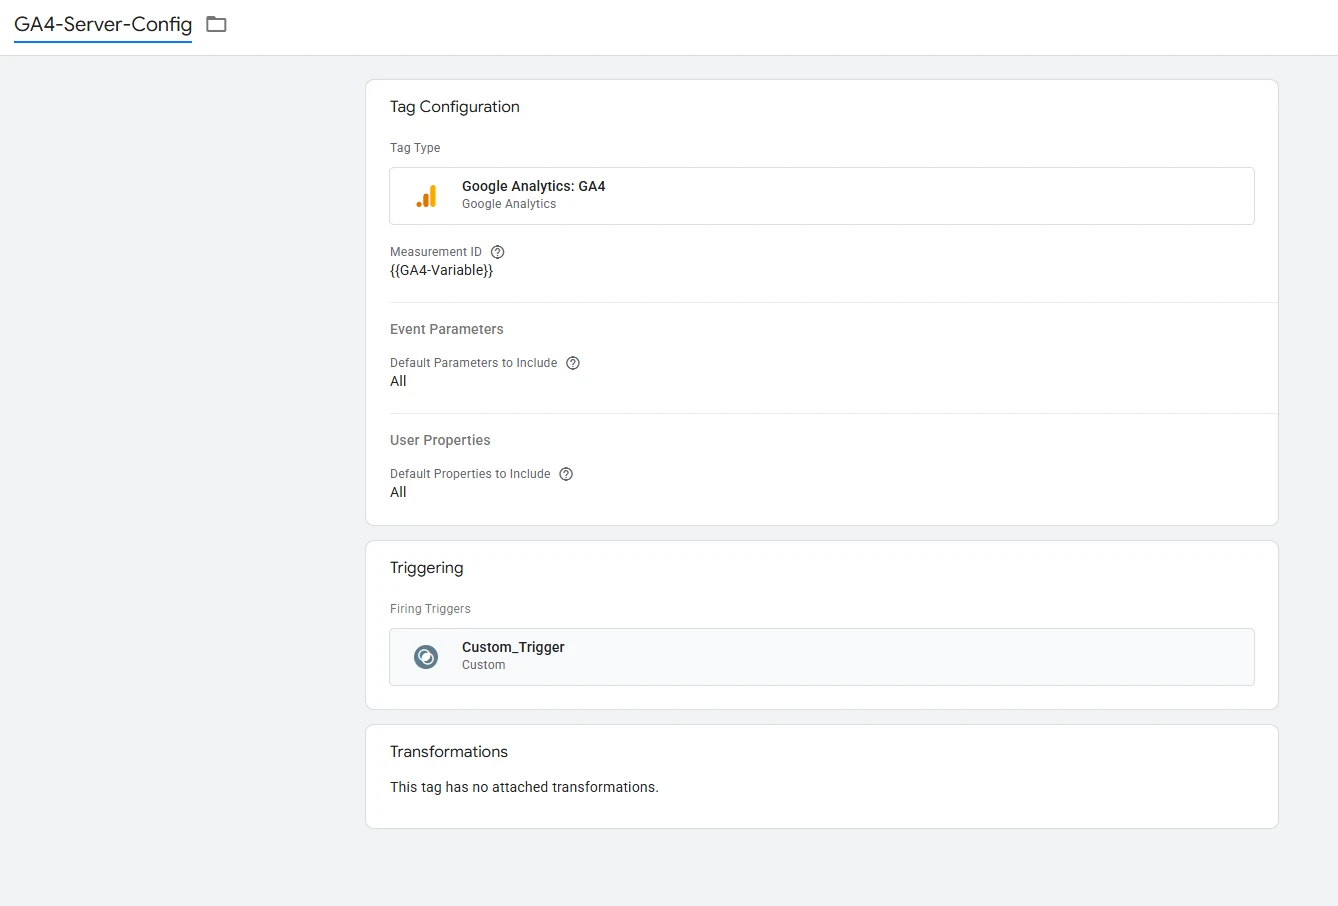
Phase 6: Go live and test
Step 18: Publish both containers
In both containers, click Submit → Publish in the top right – in the web container (GTM-XXXXXXX) and in the server container (sgtm – yourdomain.com).
Important: Only the person who started it sees preview mode. The website only tracks for real after Publish.
Step 19: End-to-end test
Finally, check the complete chain:
- Start preview in the web container and open the website.
- Keep the server container preview open in parallel.
- Navigate on the website – a
page_viewevent must arrive in the server preview and theGA4 – Servertag must show as „fired". - In GA4 → Reports → Realtime your own visit must appear.
If this runs through, the chain is tight: browser → web container → sst.yourdomain.com → server container → GA4.
Common mistakes and fixes
Most setup problems can be narrowed down quickly:
| Symptom | Cause / fix |
|---|---|
| SSL is not issued | DNS had not propagated at deploy time → wait, deploy again |
| Preview mode does not connect | Preview server is scaled (>1 instance) → back to exactly 1 instance; proxy timeout ≥ 20 s |
| Container not reachable | Reverse proxy does not point correctly to port 8080, or the domain is misconfigured |
| No event in the server preview | server_container_url missing/wrong, or web container not published |
| GA4 tag does not fire | Check the custom trigger: Client Name equals GA4 (case-sensitive!) |
| Conversions doubled in Meta | Pixel and CAPI without clean event-ID deduplication |
| Data doubled or missing | CONTAINER_CONFIG must be byte-identical on the preview and tagging server |
| No live data, only preview | Forgot Submit → Publish in both containers |
That completes the setup. The following sections go deeper into the why behind it: what server-side tracking exactly is, which advantages and disadvantages it has, what it costs and how to extend it with Meta CAPI, Google Ads and further platforms.
What is server-side tracking?
In classic tracking, the browser loads numerous vendor scripts (Google Analytics, Google Ads, Meta pixel) and sends the data directly to the respective providers. Server-side tracking pushes an instance of your own in between: the browser only collects the events and sends them to your own server. This server processes the data and forwards it to the target systems in a controlled way.
The difference sounds small but is fundamental. Instead of every ad tool reading along unfiltered in the browser, the company itself decides which data leaves the house – and by which route. Processing happens on a server the company controls, no longer exclusively in the user’s browser.
Client-side vs. server-side tracking: the difference
Both approaches measure the same thing but differ in the path of the data:
| Feature | Client-side tracking | Server-side tracking |
|---|---|---|
| Where do the tags run? | In the visitor’s browser | On your own server |
| Where does the data go? | Directly to Google, Meta & co. | First to your server, then filtered onward |
| Ad blockers / ITP | Block many requests | Apply less often (first-party domain) |
| Cookie lifetime | Often capped at 7 days / 24 h | Server-set, much longer |
| Control over data | Low | High (filter, shorten, mask) |
| Website load time | Heavy scripts in the browser | Load moves to the server |
| Setup effort | Low | Higher |
| Ongoing costs | None | Hosting (from ~20 €/month) |
For practice this means: anyone running serious paid advertising can hardly avoid server-side tracking, because every conversion that is not captured trains the algorithms worse and raises the cost per action. Those who only use Google tools and move little budget can start with a lighter setup.
The advantages of server-side tracking
The effort pays off for several reasons that feed directly into data quality and therefore into better marketing decisions.
Advantage 1: More complete data
Requests go to your own domain (sst.yourdomain.com) instead of google-analytics.com. Ad blockers and tracking protection mostly work with block lists of known tracking domains – your own subdomain is not on them. As a result, far fewer events are swallowed and the data base becomes more reliable. Depending on the setup, providers report a data quality uplift in the double-digit percentage range.
Advantage 2: Longer cookie lifetime and better attribution
Browsers such as Safari and Firefox aggressively cap cookies set client-side via JavaScript – partly to seven days or even 24 hours. Server-set first-party cookies are not affected and live longer. This improves user recognition and therefore the accuracy of attribution across longer customer journeys.
Advantage 3: Full data control and data protection
In the server container you can control exactly what is passed on: truncate IP addresses, remove or mask personal fields (PII), filter individual parameters – before anything goes to Google or Meta. This control is not only a privacy advantage but also a quality advantage, because the data structure becomes clean and consistent.
Advantage 4: Faster website
Heavy vendor scripts move from the browser to the server. This reduces the JavaScript load in the browser, which benefits load time and Core Web Vitals – a factor that in turn feeds into search engine optimization.
Advantage 5: Data enrichment
Perhaps the strongest, often underestimated lever: on the server, events can be combined with data from other systems before they go to the ad platform. An example: on a form submission the website only delivers the email address. The server uses it to query the CRM, fetches first name, last name and further attributes and sends an enriched conversion to Google Ads. This improves attribution and the targeting of campaigns.
Advantage 6: One event stream, several destinations
Once the server container is set up, several destinations can be served from one event stream: GA4, Google Ads, Meta Conversions API, TikTok, LinkedIn – without loading a new browser script for each tool. This is the technical basis for robust conversion tracking in eCommerce and in any multi-channel strategy.
Advantage 7: Tracking IDs and API keys hidden
Because tags and configuration live on the server, measurement IDs, API keys and logic are no longer openly visible in the website’s source code. This makes them harder for third parties to read and reduces the attack surface.
Remember: Server-side tracking is neither a pure privacy feature nor a pure performance feature – it is both. It improves data quality and at the same time returns control over which data the company shares.
The disadvantages and limits
An honest counter-calculation belongs here. Server-side tracking is no sure-fire success.
Disadvantage 1: Higher complexity and required know-how
Containers, subdomain, tags, triggers, variables and deduplication must work together correctly. This requires knowledge of HTTP requests, consent management and debugging. A faulty setup delivers worse data than before, not better.
Disadvantage 2: Ongoing costs
Unlike purely client-side tracking, the server container incurs hosting costs. The range goes from a few euros for a small, self-hosted VPS to triple-digit amounts with high traffic or Cloud Run operation. More on this in the cost section.
Disadvantage 3: Not every tool is server-side capable
Some services work exclusively client-side, such as heatmap and session-recording tools like Hotjar. For such tools a browser tag remains necessary. So server-side does not replace every client-side tag but complements the most important ones.
Disadvantage 4: Maintenance effort
Server updates, keeping the Docker image current, adjustments to platform changes and ongoing monitoring are permanent tasks. A managed service takes part of this effort off your hands but costs more.
Disadvantage 5: No replacement for consent
The most common misconception: server-side tracking does not bypass the consent requirement. Moving the data to the server does not lift the legal basis. A consent banner and Consent Mode v2 remain mandatory.
What does server-side tracking cost?
The software is free – GTM and the Docker image cost nothing. The ongoing costs arise exclusively from hosting the server container. Three routes with a different effort-to-cost ratio:
| Hosting option | Setup | Cost (guideline) | Data control | Suitable for |
|---|---|---|---|---|
| Self-hosted (this guide) | high | from ~10–20 €/month (VPS) | maximum | technical skills available, full data sovereignty |
| Google Cloud Run | medium | ~50–120 €/month | high | Google-Cloud-savvy teams |
| Managed (e.g. Stape, TAGGRS) | low | free tier, paid from ~25 €/month | medium | quick start without server ops |
Good to know: The figures are guidelines and scale with traffic and the number of server-to-server tags. For most small and medium websites, the self-hosted route is by far the cheapest – and that is exactly what this guide describes.
Hosting options compared
- Self-host (Docker): maximum control and lowest costs, in exchange for taking responsibility for operation, updates and availability. The route of this guide.
- Google Cloud Run: the path Google recommends in its docs, scales well, but is more expensive and tied to Google Cloud.
- Managed services (Stape, TAGGRS, etc.): set up the server in minutes and provide CDN, monitoring and logs. Convenient, but with less data sovereignty and a recurring subscription fee.
This guide uses the self-hosted route because it offers full control at the lowest ongoing cost – and because the Docker image runs on any server able to do HTTPS behind a reverse proxy.
Extend server-side tracking: Meta CAPI, Google Ads & more
Once GA4 is connected through the server, the biggest strategic advantage becomes usable: serving several platforms from one event stream.
Meta Conversions API (CAPI)
The Conversions API sends web, app and offline events directly from the server to Meta. Combined with the browser pixel, this creates a redundant, more robust data stream. So that the same conversion is not counted twice, Meta deduplicates events using a shared event ID and the event name. This is exactly where the most common mistake lies: without clean deduplication, it either double counts or events are missing.
Google Ads and Enhanced Conversions
In the server container, in addition to GA4 a Google Ads conversion tag can be added. Enhanced Conversions transmits hashed first-party data (e.g. the email address via SHA-256) and thereby improves the accuracy of conversion measurement – controlled centrally and consistently through the server.
Further platforms
Through the same setup, the TikTok Events API, LinkedIn, Pinterest or Microsoft Ads can be connected server-side. Each platform becomes an additional tag in the server container – without a new browser script.
Data enrichment from the CRM
The strongest lever: enrich events before they are passed on with data from CRM, shop or data warehouse. An initially thin conversion (only a transaction ID) is enriched server-side with customer value, contribution margin or segment – the basis for value-based bidding.
Operations, monitoring and scaling
In day-to-day operation, sGTM is barely compute-intensive: one instance at idle uses ~256–512 MB of RAM at almost 0% CPU. Google’s rule „max. 1 vCPU per instance” means: for more throughput, scale horizontally (several lean tagging instances) rather than one large instance. Load rises mainly from high traffic volume and from server-to-server tags (Meta CAPI, Google Ads CAPI), because every outbound HTTP call costs some CPU.
| Observed CPU usage | Action |
|---|---|
| consistently < 60% | All good, do nothing |
| consistently > 70–80% | Add another tagging instance |
Monitoring means using the preview mode of the server container regularly as a spot check and verifying tag firing. Maintenance means keeping the stable image tag current and, with every major release, pulling the image again and restarting the containers.
Security
A self-hosted tagging server is a production service and should be secured accordingly:
- HTTPS only to the outside: Only port 443 is publicly reachable, with a valid certificate and an automatic HTTP→HTTPS redirect. The container port 8080 stays internal.
- Minimize the attack surface: Keep only necessary ports open on the host (HTTPS, and SSH if needed). Use SSH key authentication instead of passwords and enable automatic security updates.
- Keep the image current: Pull the
stableimage regularly – it contains OS and Node security fixes. - Least privilege: The image is „distroless" and runs without root/shell – do not install additional tools in the container.
- Data minimization: Forward only necessary data in the server container, anonymize IPs, remove PII and write no personal data to logs.
- Availability & backup: Keep health checks (
/healthy) active, restart containers automatically and export the GTM container regularly.
Consent Mode v2 and GDPR
In data protection terms, server-side tracking is an opportunity, not a loophole. The advantage lies in data minimization: because the company controls the data stream, it can truncate, anonymize or simply not pass on personal data before anything goes to a service outside the EU.
What server-side does not do: replace consent. For Google Ads and remarketing, Consent Mode v2 is mandatory in the EU. So a consent banner (CMP) is still needed that collects consent and passes it through to GTM. Only on this basis may marketing tags set cookies and send complete data.
Remember: The order is always banner → Consent Mode → tags. Server-side tracking improves the technical path of the data but changes nothing about the legal basis. Data protection and data quality belong together.
Who benefits from server-side tracking
| Situation | Recommendation |
|---|---|
| Several ad platforms (Google + Meta + more) | Server-side GTM, self-hosted or managed |
| Notable paid advertising budget | Server-side GTM, Meta CAPI, Enhanced Conversions |
| Data enrichment from CRM or shop wanted | Server-side GTM |
| High data protection requirements | Server-side GTM with EU hosting |
| Only Google tools, small budget, little tech | lighter setup, expand later |
| Very low traffic, no ad budget | client-side with clean consent is enough for now |
The rule of thumb: the more money flows into paid advertising, the more expensive every conversion that is not captured becomes, because the platform algorithms optimize worse with incomplete data. That is exactly where the investment in server-side pays off fastest.
Server-side tracking with Dometrics
A self-hosted server-side setup is powerful, but the clean configuration, the GDPR-compliant data filtering and the connection to Google Ads and Meta CAPI decide its actual value. Dometrics builds exactly this data foundation – server-side tracking, a custom dashboard and real-time reporting – as the technical basis on which every performance optimization becomes possible in the first place. More on the Tracking & Data Analytics page.
Conclusion
Setting up server-side tracking yourself is no magic: a small server, two GTM containers and a cleanly tested setup are enough. The reward is more complete data, longer cookie lifetimes and full control over what the company shares – the dependable basis for every marketing decision. The disadvantages (complexity, cost, maintenance) are real but manageable, and with every euro of ad budget the benefit grows. If you want to dig into the strategy behind it, you will find it in the foundational article Server-side vs. client-side tracking; if you would rather hand over the implementation, with Tracking & Data Analytics.
Frequently asked questions
What is server-side tracking?
With server-side tracking, tracking events are no longer sent directly from the browser to Google, Meta & co. Instead, they first go to your own server (the tagging server), which processes the data and forwards it to the target systems in a controlled way. This improves data quality, page speed and data protection.
What is the difference between server-side tracking and server-side tagging?
The terms are mostly used interchangeably. Strictly speaking, tracking describes the collection of data and tagging describes the distribution to target systems via tags. In practice both mean the same setup: a server container that receives browser events and forwards them.
Do you need Google Cloud for server-side tracking?
No. The tagging server is a simple Docker image that runs on any server able to operate Docker containers behind a reverse proxy with HTTPS. In GTM you choose the „Manually provision tagging server" path – Google Cloud Run is not required. Alternatively there are managed services such as Stape or TAGGRS.
What does server-side tracking cost?
The software (GTM, Docker image) is free. Self-hosted on your own VPS, operation starts in the low double-digit euro range per month depending on the provider. Google Cloud Run is rather around 50 to 120 euros per month as a guideline, and managed services often offer a free tier and paid plans from around 25 euros per month.
What are the advantages of server-side tracking?
More complete data despite ad blockers and browser restrictions, longer cookie lifetimes and therefore better attribution, full control over the data passed on, a faster website, data enrichment from your own systems, and one event stream for several destinations such as GA4, Google Ads and Meta CAPI.
What are the disadvantages of server-side tracking?
Higher complexity and the technical know-how required, ongoing hosting costs, maintenance effort and the fact that not every tool is server-side capable. In addition, server-side tracking does not replace the consent requirement: a consent banner and Consent Mode v2 remain necessary in the EU.
How much server power does a tagging server need?
For small to medium websites, 2 vCPUs and 4 GB of RAM are comfortably enough. A single sGTM instance uses roughly 256 to 512 MB of RAM at idle and should get a maximum of 1 vCPU. For higher volumes you scale horizontally with several lean instances rather than one large one.
What is the difference between the web container and the server container?
The web container runs in the browser of the visitor and collects the events. The server container runs on your own server, receives those events and forwards them to GA4, Google Ads or Meta. Server-side tracking always needs both containers.
Which subdomain should you use for the tagging server?
Always use a subdomain of the actual tracking website, for example sst.yourdomain.com if yourdomain.com is being tracked. Only this keeps the cookies in a first-party context. A third-party domain would cancel out that advantage.
Is server-side tracking GDPR-compliant?
Server-side tracking can improve data protection because IP addresses can be truncated, personal fields removed and data filtered before anything goes to Google or Meta. However, it does not replace the consent requirement: a consent banner (CMP) and Consent Mode v2 remain mandatory in the EU.
Does server-side tracking replace the cookie banner?
No. User consent remains mandatory. Server-side tracking only changes the technical path of the data, not the legal basis. For Google Ads and remarketing, Consent Mode v2 is mandatory in the EU.
Does server-side tracking work against ad blockers?
It reduces the losses significantly but is not full protection. Because the data runs through your own subdomain, many block lists do not apply. Scripts that the browser still loads can be blocked individually, which is why the trend is to move as much as possible to the server.
Does server-side tracking make the browser pixel unnecessary?
Usually not. The most robust solution is a hybrid setup of browser pixel and server-side channel. A shared event ID is used to deduplicate identical events so that no conversion is counted twice. The two paths complement each other rather than excluding one another.
How do you test whether server-side tracking works?
Start preview mode in the server container, open the website and navigate. A page_view event must arrive in the server preview and the GA4 tag must show as „fired". Then check in GA4 under Reports and Realtime whether the visit appears.
Why is my GA4 server tag not firing?
It usually comes down to the custom trigger in the server container. The condition must read exactly Client Name equals GA4 – mind the capitalization. In addition, both containers (web and server) must be published via Submit and Publish, not just running in preview.
Who benefits from server-side tracking?
Above all companies with a notable paid advertising budget, because every conversion that is not captured trains the algorithms worse and raises the cost per action. Likewise brands with high data protection requirements and websites that optimize for performance and SEO. With a very small budget, a clean client-side setup is enough for now.